Personal Account Ledger
The application lives here:
https://msaccess.pythonanywhere.com
Note
If the Application Export is downloaded from the above link, ie. to try the application by yourself, the first thing needed is to install Python libraries.
Providing the Jam.py is already installed and a new application created, please execute below for Windows before Importing the downloaded file:
py -m pip install password_strength
Or Linux:
pip install password_strength
Overview
The Access Template Personal Account Ledger has a “feature” which enables typing the negative value for currency. Then the actual Expense is automatically converted to Income, since the negative currency becomes a positive value! Our migrated project does not allow for this due to validation.
The complete application was developed in a few hours` time. Below is the approximate process:
The template was uploaded to https://jampyapplicationbuilder.com/conv/ to give us all tables and data needed for the project.
All tables were imported into the Jam.py Application Builder from the provided link after the upload. Since the Access Categories Form has a Drop-down list with the Income and Expense, the Lookup List was created with the same.
Lookup List
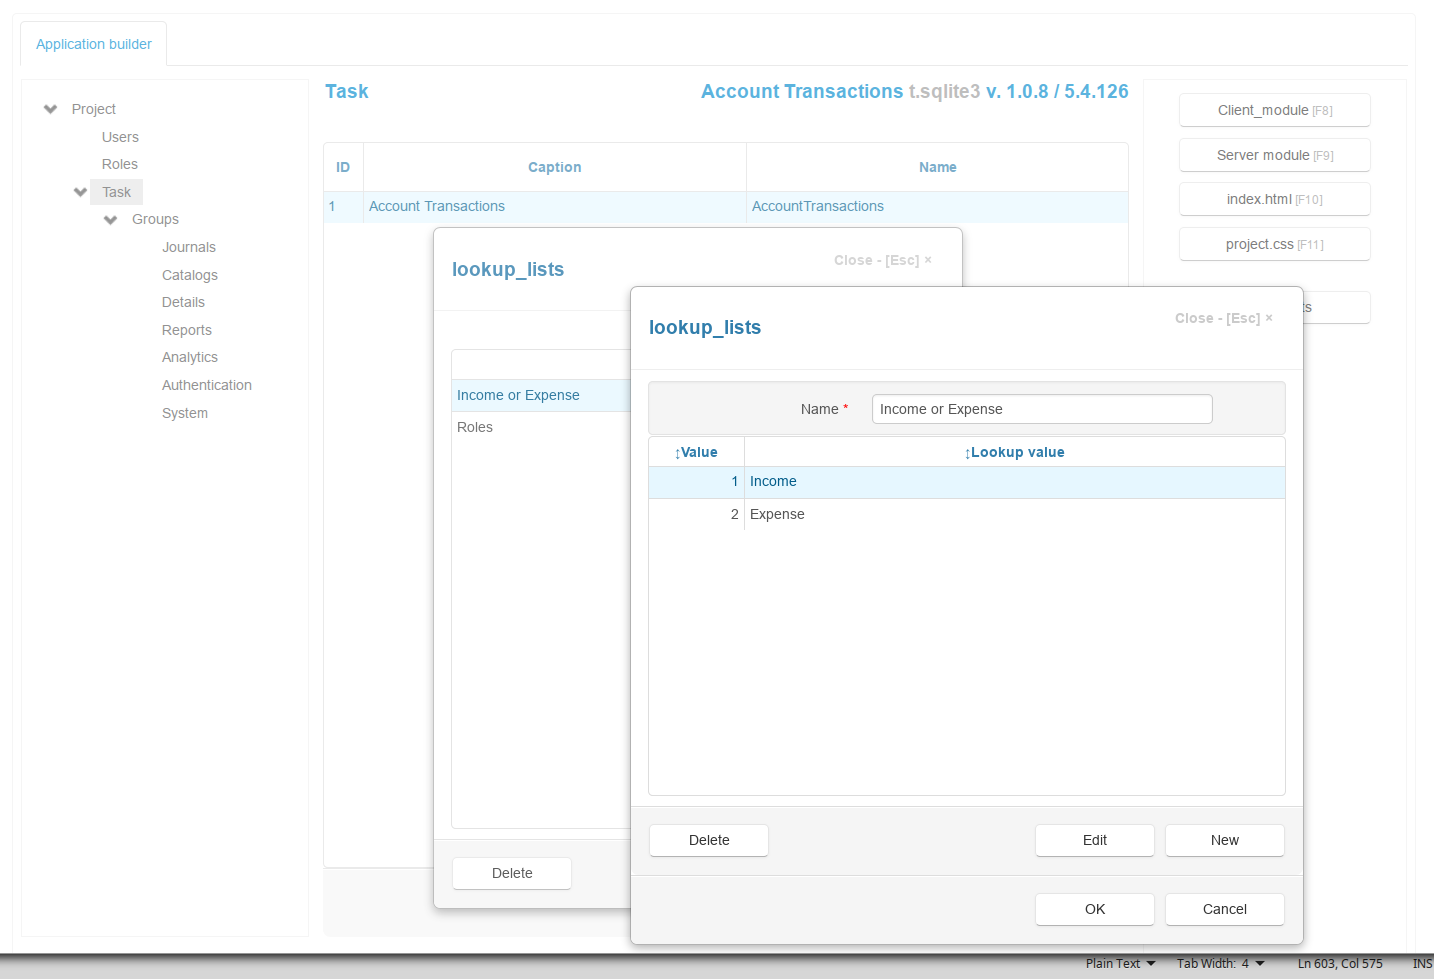
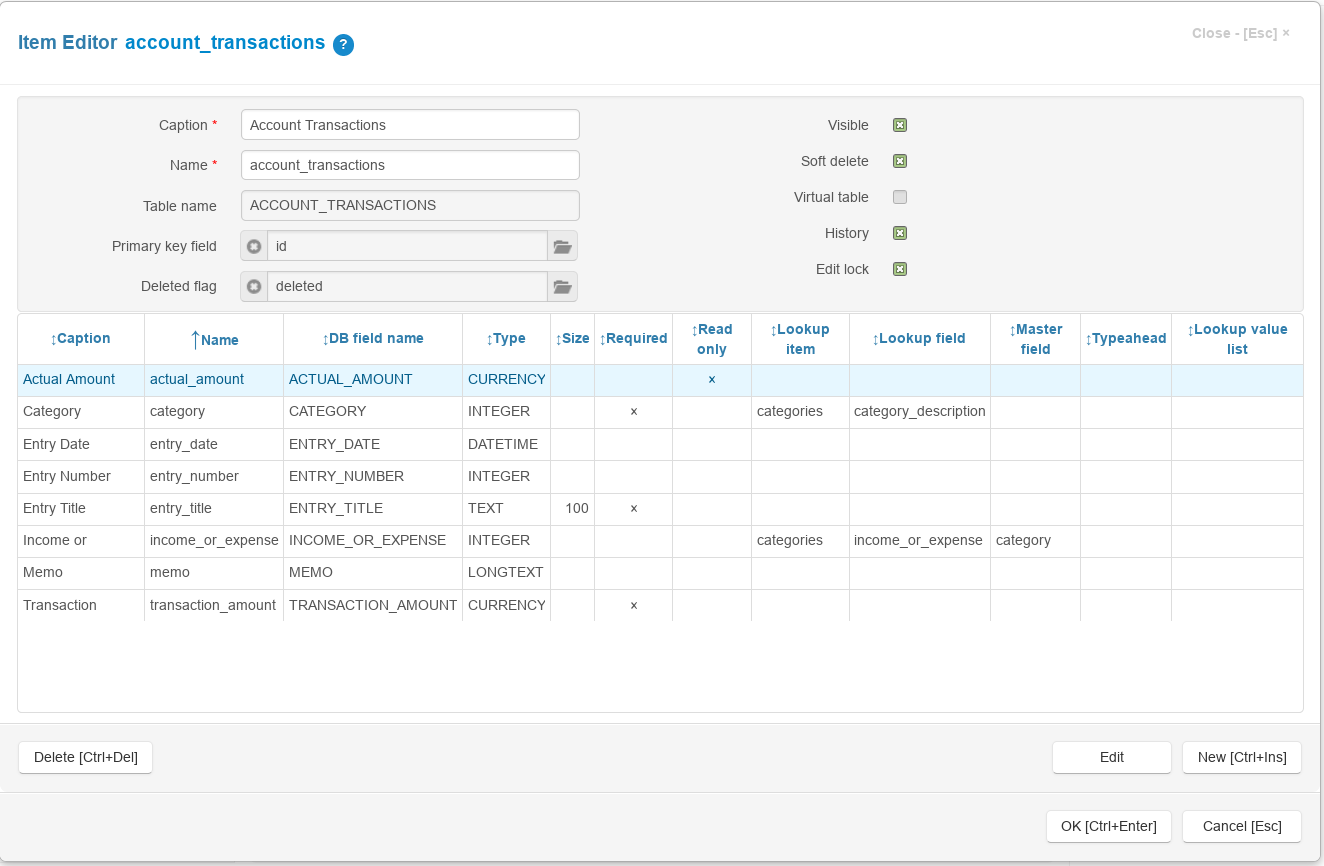
By looking at the Access Database Tools Relationships, the Account Transactions table Category field was linked by the Lookup Item to Categories Description field. The Income or Expense field was created in the Transaction table and linked to the Categories same field. Also, the actual_amount field was added, since in Access this is a query field.
The Categories Income or Expense was linked to Lookup Value List.

A little code
The first code was added to restrict adding a negative currency with the MessageBox displaying the Alert.
function on_field_validate(field) {
    if (field.field_name === 'transaction_amount' && field.value < 1) {
            return 'The amount cant be negative!';
    }
}
Then, we observed how is Access displaying the Expense/Income formatting in red and green color on the Data Grid. The decision has been made to display the actual Expense/Income text in a coloured way as well as the value.
The code was added to accommodate for the above:
function on_field_get_html(field) {
    let item = field.owner;
    if (field.field_name === 'category') {
        let color = 'green';
        if (item.income_or_expense.display_text === 'Expense') {
            color = 'red';
        }
        return '<span style="color: ' + color + ';">' + field.display_text + '/' + field.owner.income_or_expense.display_text + '</span>';
    }
    if (field.field_name === 'actual_amount' || field.field_name === 'category') {
        let color = 'green';
        if (item.income_or_expense.display_text === 'Expense') {
            color = 'red';
        }
        return '<span style="color: ' + color + ';">' + field.display_text + '</span>';
    }

}
Because Access is triggering the displaying of Actual Amount relative to Expense option in red color, or Income as green colour, the code was added to trigger the similar behaviour:
function on_field_changed(field, lookup_item) {
    var item = field.owner;
    if (field.field_name === 'transaction_amount' || field.field_name === 'category') {
        calculate(item);
    }
}
The JS function is needed to actually do the displaying of positive to negative values and vice versa:
function calculate(item) {
    if (item.income_or_expense.value) {
        item.actual_amount.value = item.transaction_amount.value;
        if (item.income_or_expense.display_text === 'Expense') {
            item.actual_amount.value = -item.actual_amount.value;
        }
    }
    else {
        item.actual_amount.value = 0;
    }
}
Some formatting was added to make the Entry Title in bold. The below function was added at the end of on_field_get_html function from above:
if (field.field_name==='entry_title') {
    return '<strong>' + field.display_text + '</strong>';
}
Then, the Dashboard/Reports was added. Some tlc is still needed for those. The Dashboard was covered in “How was Demo built?” topic
Note
The above is all from the actual application Front End point of view. It looks pretty similar to Access, correct? At this moment it is absolutely possible to turn on the “Safe Mode”, which is the Authentication.
All of the above was added to Account Transactions Client module. No more code is needed for Access basic Front End look and feel. The additional code for Authentication was copy/paste from the https://jampyapp.pythonanywhere.com/ project. Please observe the code and needed tables within the Builder/Authentication tab. Also, the index.html file was modified and added simple-line-icons support with the Task/project.css. Same copy/paste from the mentioned project.
The Clone button was developed latter to emulate the support for highlighted row copy/paste.
The Delete button was disabled with the MessageBox displaying the Alert, since the deletion is disabled for Publicly accessible application. This is controlled in Task/Account Transaction/Client module, please search for deleted, since deletion is actioned on CTRL+DEL as well.
After two weeks running and some feedback from the Users, the Account Transaction/Filter was added. Also, some formatting was developed, particularly for displaying red and green Actual Amount on the Form. This is not the Data Grid formatting, which was added from the beginning. Hence, consider the above positive to negative function. The function was missing the CSS needed for the Form. The new function is below:
function calculate(item) {
    if (item.income_or_expense.value) {
        item.actual_amount.value = item.transaction_amount.value;
        if (item.income_or_expense.display_text === 'Expense') {
            item.actual_amount.value = -item.actual_amount.value;
            item.edit_form.find('input.actual_amount').css('color', 'red');
        }
        else {
            item.edit_form.find('input.actual_amount').css('color', 'green');
        }
    }
    else {
        item.actual_amount.value = 0;
    }
}
More formatting was added to resize the fields. Here, we introduced a new Jam.py function for changing the CSS when the Edit/New Form is active. Which is as well changing the CSS for the field, but this time on the Edit/New Form:
- on_edit_form_shown()
function on_edit_form_shown(item) {
    if (item.income_or_expense.value) {
        //item.actual_amount.value = item.transaction_amount.value;
        if (item.actual_amount.value < 1) {
            item.edit_form.find('input.actual_amount').css('color', 'red');
            //item.actual_amount.value = -item.actual_amount.value;
        }
        else {
            item.edit_form.find('input.actual_amount').css('color', 'green');
        }

    }

  item.edit_form.find('input.entry_number').parent().width('40%');
  item.edit_form.find('input.transaction_amount').parent().width('40%');
  item.edit_form.find('input.category').parent().width('60%');
  item.edit_form.find('input.categories').parent().width('60%');
  item.edit_form.find('input.income_or_expense').width('60%');
}
History/Edit Lock was added. This is a no code operation done on Project/Parameters.
The Report was missing the Income/Expense Parameter. Added. The Reports design and code might be covered latter on.
The Filters was added for Account Transaction table. Because of the “combined” Category with the “/” sign, some tweaking was needed. Here is the code added to the Account Transactions table, and the code to add three buttons. The buttons “Clone”, “Filter by type” and “Clear filters”, respectively:
function on_view_form_created(item) {
    if (!item.lookup_field) {
        var clone_btn = item.add_view_button('Clone', {image: 'icon-magic-wand'});
        clone_btn.click(function() { clone_record(item) });
    }
    //here is setting for filter by type of transaction (income or expense)
    let filter_type_btn = item.add_view_button('Filter by type', {type: 'primary', image: 'icon-filter'});
        filter_type_btn.click(function() {
            filter_by_type(item);
        });

    let clear_filters_btn = item.add_view_button('Clear filters', {type: 'danger', image: 'icon-remove'});
        clear_filters_btn.click(function() {
            item.clear_filters();
            item.refresh_page();
        });

}

function filter_by_type(item) {
    let copy = task.categories.copy({handlers: false});
    copy.open({fields: ['income_or_expense'], open_empty: true});

    copy.edit_options.title = 'Filter by type of transaction';
    copy.edit_options.history_button = false;

    copy.on_edit_form_created = function(c) {
        c.edit_form.find('#ok-btn')
            .text('Select type')
            .off('click.task')
            .on('click', function() {
                try {
                    c.post();
                    let categories_by_type = task.categories.copy({handlers: false}),
                        categories_list = [];
                        categories_by_type.set_where({income_or_expense: c.income_or_expense.value});
                        categories_by_type.open({fields: ['id']});

                        categories_by_type.each(function(s){
                            categories_list.push(s.id.value);
                        });

                        item.filters.category.value = categories_list;
                        item.refresh_page();
                    c.cancel_edit();
                }
                finally {
                    c.edit();
                }
            });
    };
    copy.on_edit_form_keyup= function(c, e) {
        if (e.keyCode === 13 && e.ctrlKey) {
            e.preventDefault();
            return true;
        }
    };
    copy.append_record();
}
More summary was added for Account Transaction table. This is a no code operation done on View Form.
Validation
This is the JS code for the transaction amount validation.
We also added on the table account_transactions,
field transaction_amount, on the the Interface Help: Value should be less then 10000.
function on_field_validate(field) {
    if (field.field_name === 'transaction_amount' && field.value < 1) {
            return 'The amount cant be negative!';
    }
    if (field.field_name === 'transaction_amount' && field.value > 10000) {
            return 'The value is be less then 10000!';
    }
}
In June 2023, added date validation to above code, and the Order by Entry Date as DESC:
if (field.field_name === 'entry_date' && field.value > Date.now()) {
        return 'The date can not be in the future!';
}
In Jan 2024, added Master/Detail for Categories:
Master/Detail
For Master/Detail View only, there is no need to do anything special other than to add a simple code to display the Detail for a Master table. Please see the Northwind Traders Master/Detail View example.
In February 2024, added Read Only on Editing for Categories table, Income or Expense field. Also added formatting.
function on_edit_form_created(item) {
    if (item.is_new()) {
        item.income_or_expense.read_only = false;
    }   else {
        item.income_or_expense.read_only = true;
    }

}
API
In November 2023, added API endpoint on Task/Server:
def on_ext_request(task, request, params):
    reqs = request.split('/')
    if reqs[2] == 'expenses':
        result = task.account_transactions.expenses(task, params)
        return result
The table account_transactions has the Server Module, which will return Total for the Actual Amount:
from jam.common import cur_to_str

def expenses(item, params):
    inv = item.task.account_transactions.copy()
    inv.open()
    total = 0
    for i in inv:
        total += i.actual_amount.value
    total = cur_to_str(total)
    return(total)
The API can be accessed with:
curl -k https://msaccess.pythonanywhere.com/ext/expenses -d "[]" -H "Content-Type: application/json"
Now that we have API in place, it is trivial to use it in any other Jam.py application within the Server Module:
try:
# For Python 3.0 and later
    from urllib.request import urlopen
except ImportError:
    # Fall back to Python 2's urllib2
    from urllib2 import urlopen
import json
import time

url = 'https://msaccess.pythonanywhere.com/ext'

def send(url, request, params):
    a = urlopen(url + '/' + request, data=str.encode(json.dumps(params)))
    r = json.loads(a.read().decode())
    return r['result']['data']

result = send(url, 'expenses', [])
print(result)
For example, on NorthwindTraders, we created a table api_call,
with the field Value. The value of this field is populated by the Server Code within the same table.
The code is executed by the button Fetch from API.
index.html
Added the Export tab to download the latest source code. The Export feature is available by default on the Application Builder. The Builder is not accessible publicly due to the security reasons. Here is the code added to index.html file below “about” and Account Transaction table “function on_page_loaded(task)”:
<li id="about"><a href="#">About</a></li>
<li id="export"><a href="#">Export</a></li>
$("#menu-right #export a").click(function(e) {
            var url = [location.protocol, '//', location.host, location.pathname].join('');
            url += 'static/internal/AccountTransactions.zip';
            window.open(encodeURI(url));
});
Maybe the last feature needed is the CVS (spreadsheet) export/import. This step is fully documented in the official documentation.
Note
To Be Continued when/if more features were added …